SSH IoT Device Anywhere Example AWS: Connecting Your Gadgets Remotely
Getting your IoT devices to talk to you, no matter where you are, is a pretty big deal these days. It means you can check on things, make changes, or even fix issues from across town or across the globe. This kind of remote reach, especially for your smart gadgets, really makes a difference for how you manage them.
Think about a small sensor array out in a field, or maybe a smart home system you want to adjust while you are away. You need a way to reach these devices securely, and that is where the idea of using SSH comes in. It is a very common method for making secure connections, and it is something many people rely on for their remote work, too.
This article will show you how to use SSH to connect to your IoT devices from just about anywhere, using AWS as a helpful middle ground. We will talk about why this setup makes sense, what pieces you will need, and how to put it all together. You will get a clearer picture of how to keep your devices within your reach, which is that kind of peace of mind many people are looking for.
Table of Contents
- Why SSH for Your IoT Gadgets?
- The Hurdles of Reaching IoT Devices
- AWS as Your Remote Bridge
- Setting Up Your Remote Connection: A Step-by-Step Idea
- Keeping Your Connection Safe and Sound
- Sorting Out Connection Problems
- Frequently Asked Questions (FAQs)
Why SSH for Your IoT Gadgets?
SSH, which stands for Secure Shell, is a very common way to connect to computers over an unsecured network. It is almost like having a direct, private line to your device, even if you are not physically there. For IoT devices, this means you can send commands, get information, or update software without needing to be right next to the little gadget, which is quite handy.
The Basics of SSH
When you use SSH, you are connecting via a special way, as indicated by things like an `ssh://` part in a connection address, you know. This tells your computer that you want to make a secure connection. It is the standard method for many remote tasks, so it is something you will often see in server management and now, more and more, with IoT devices, too.
A key part of how SSH works is that every host, or computer you connect to, has a unique key. Your computer, which is the client, actually remembers the host key that belongs to a particular device. This helps make sure you are connecting to the correct device and not some imposter, which is a good thing for safety, you see.
Security with Keys
Using SSH often involves special key pairs, one public and one private. These keys are a bit like a very strong lock and key. The public part of the key goes on the device you want to connect to, and you keep the private part safe on your own computer. When you try to connect, these keys work together to prove who you are, making the connection very secure, you know.
I once had to connect to a special SSH proxy server using a key pair I made just for that purpose, not my usual default key. It worked fine when I was at my workplace. But then, when I tried it from home, the terminal would sometimes freeze for a long time. This shows that while keys are great for security, other things like network setup can also affect how well SSH works, which is a bit frustrating.
Common SSH Quirks
Sometimes, when you use SSH, you might want to see graphical things from the remote device, like a program's window. This is called X11 forwarding. If you run SSH and your display does not show up, it means SSH is not sending the X11 connection along. To make sure SSH is sending X11, you can look for a line that says "requesting X11 forwarding" in the output of your connection attempt, which is a simple check.
There was also a time when fetching or pulling from Git repositories, or cloning them, would get stuck at a certain point. It seemed like the remote script was returning a strange number, 255, and SSH was just giving that result back. This kind of thing can happen, and it often means you need to look at what the script on the other side is doing, you know.
Another thing to remember is that you might need to add your identity using a tool like Keychain. This helps keep your SSH keys ready to use without you having to type in your password every single time you connect. It is a small thing, but it makes a big difference in how smooth your daily work feels, which is very helpful.
The Hurdles of Reaching IoT Devices
Connecting to an IoT device that is sitting far away is not always as simple as it sounds. These little gadgets are often behind home routers or company networks, which can make them hard to reach directly. You have to think about how data gets from your computer to the device and back, and there are often some roadblocks in the way, that is for sure.
Network Firewalls and Dynamic IPs
One common problem is firewalls. These are like digital security guards that stop unwanted connections from coming in. Your home router, for instance, has a firewall that usually blocks outside attempts to connect to devices inside your house. So, trying to SSH directly to your IoT device at home from outside will often just hit a wall, you see.
Another issue is dynamic IP addresses. Many internet providers give you a different IP address every so often. This means the public address of your home network can change, making it tough to know where to send your SSH connection. It is like trying to mail a letter to a house that keeps moving, which is not practical at all.
Keeping Things Safe
Beyond just reaching the device, you also have to think about keeping the connection safe. You do not want just anyone being able to connect to your smart thermostat or your security camera. So, any method you use needs strong ways to make sure only authorized people can get in, which is pretty important.
AWS as Your Remote Bridge
This is where a cloud service like Amazon Web Services (AWS) can come in very handy. Instead of trying to connect directly to your IoT device, you can use AWS as a kind of middleman. Your IoT device connects out to AWS, and then you connect to AWS, too. This creates a secure path even when direct connections are not possible, you know.
What AWS Brings to the Table
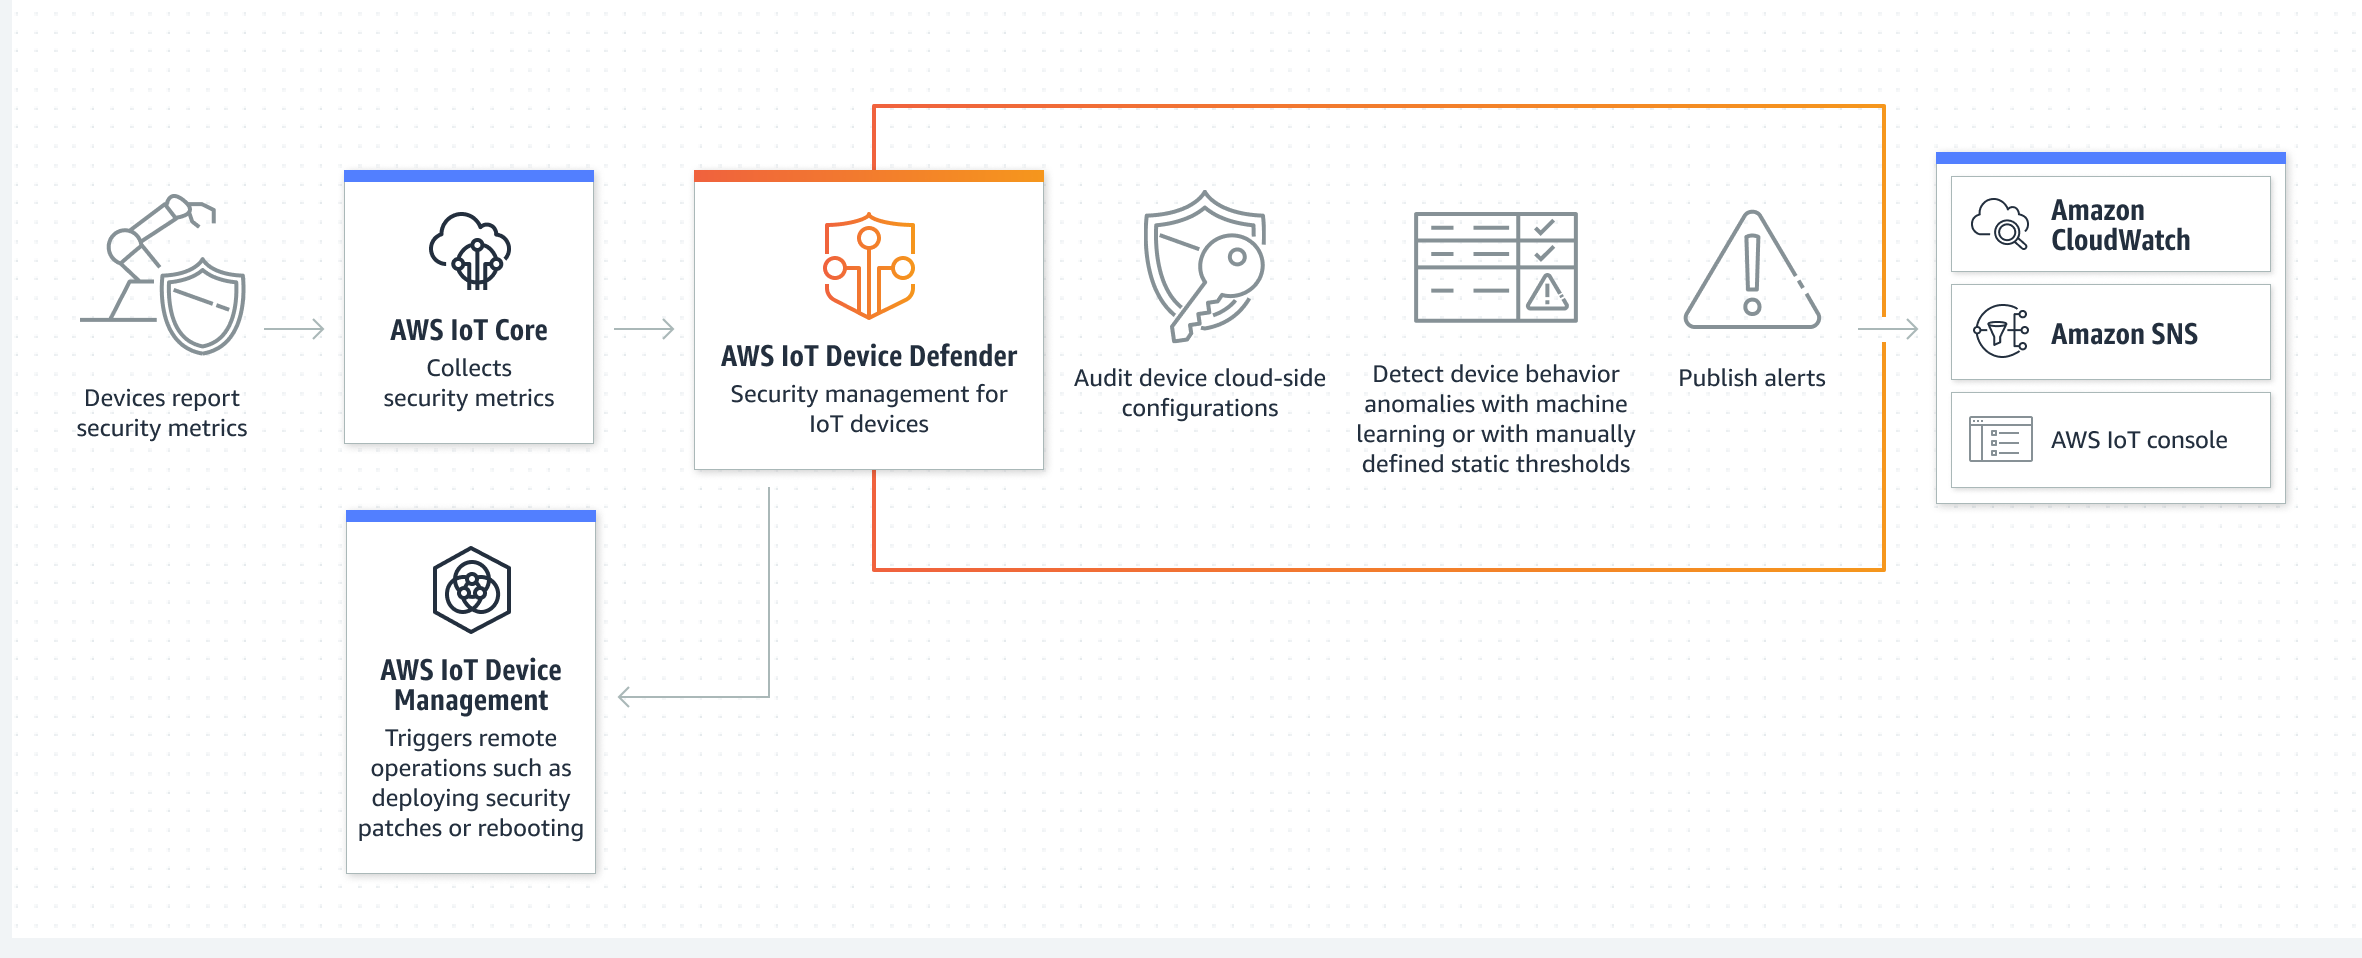
AWS offers many services that can help with this. AWS IoT Core, for example, is made for managing lots of IoT devices. It can help devices talk to the cloud in a secure way. Then, you can use other AWS services, like a virtual server called an EC2 instance, to act as your secure jump point, which is pretty neat.
Using AWS means you get a stable, public place that your IoT device can always connect to. AWS also has very strong security features built in, so you can set up rules about who can connect to what. This helps get around those firewall and dynamic IP problems we talked about earlier, which is very useful.
Using an EC2 Instance as a Jump Point
An EC2 instance in AWS can be set up as what people sometimes call a "bastion host" or "jump box." This is a server that sits out on the internet with a known, unchanging address. Your IoT device can make an outbound connection to this EC2 instance, and then you can make an inbound connection to the same EC2 instance. This creates a secure tunnel, more or less.
This method means your IoT device does not need to have any special inbound ports open on its local network. It just needs to be able to make an outgoing connection to the internet, which most devices can do. This makes the whole setup much simpler and safer for devices behind tricky home networks, too.
Setting Up Your Remote Connection: A Step-by-Step Idea
Putting this all into practice involves a few steps. It is about getting your AWS part ready, then preparing your IoT device, and finally making the connection. This is a general idea of how you might go about it, which is often helpful for getting started.
Getting Your AWS EC2 Instance Ready
First, you would start by setting up a new virtual server, an EC2 instance, in your AWS account. You pick a small one, perhaps a t2.micro, as it is often free for new users and quite enough for this job. You will need to choose a basic operating system like Ubuntu or Amazon Linux, you know.
During the setup, AWS will ask you to create a key pair. This is very important. You will download the private part of this key to your computer. This key is what you will use to SSH into your EC2 instance later. Keep this file safe and do not share it with anyone, as a matter of fact.
Configuring Security for Your Connection
Next, you set up what AWS calls a "security group" for your EC2 instance. This is like a firewall for your virtual server. You will want to allow incoming SSH connections (port 22) only from your own IP address, or from a very specific range of IPs. This keeps your jump point secure from random attempts, which is pretty important.
You also need to think about allowing connections from your IoT device to this EC2 instance. This might involve allowing SSH connections from any IP address (0.0.0.0/0) on a specific port, but only if your IoT device is set up to connect *out* to the EC2 instance. This is where the tunnel idea comes in, you see.
Getting Your IoT Device Ready
On your IoT device, whether it is a Raspberry Pi or something similar, you will need to make sure it has an SSH client installed. Most Linux-based IoT devices already have this. You will also need to put the public part of an SSH key on your IoT device, so you can connect to it. This is a separate key pair from the one you use for AWS, you know.
Then, you set up your IoT device to make an outgoing SSH connection to your AWS EC2 instance. This connection will create a tunnel. For example, you might set up a reverse SSH tunnel where a port on your EC2 instance gets connected to a port on your IoT device. This means traffic to that EC2 port gets sent to your IoT device, which is quite clever.
You might use a command like `ssh -N -R 2222:localhost:22 user@your_ec2_ip_address` on your IoT device. This tells the device to listen on port 22 on itself, and forward anything from port 2222 on the EC2 instance to its own port 22. This makes the connection happen, anyway.
Making the Connection Happen
Once your IoT device has made its outgoing tunnel connection to the AWS EC2 instance, you can then connect to your IoT device through the EC2 instance. From your local computer, you would SSH to your EC2 instance, but specify the port that is now forwarding to your IoT device. So, it would look something like `ssh -p 2222 iot_user@your_ec2_ip_address`, you know.
This way, your SSH connection goes from your computer, to the EC2 instance, and then through the tunnel that your IoT device set up, right to the device itself. It is a secure, indirect path that gets around those tricky network issues. This is how you can effectively SSH into your IoT device from just about anywhere, basically.
Keeping Your Connection Safe and Sound
While SSH itself is very secure, how you set things up and manage them makes a big difference in overall safety. You want to make sure your remote access stays private and only for you. There are a few things to keep in mind to do this well, you know.
Managing Your SSH Keys Well
The keys you use for SSH are your digital identity for these connections. You should always keep your private keys very safe on your local computer. Never share them, and protect them with a strong password. If someone gets your private key, they could pretend to be you and connect to your devices, which is a serious problem.
It is also a good idea to use different key pairs for different purposes. For example, have one key for your AWS EC2 instance and a different one for your IoT devices. This way, if one key ever gets compromised, the damage is limited. This is a simple but very effective safety measure, you see.
Only Giving Needed Access
When you set up users on your IoT device or your EC2 instance, give them only the permissions they absolutely need to do their job. This is often called the "principle of least privilege." If a user only needs to read sensor data, do not give them permission to delete files. This helps stop accidental mistakes or malicious actions, which is pretty smart.
For your EC2 security group, be very specific about which IP addresses can connect to it on port 22. If your home IP address changes often, you might need to update this rule sometimes. But avoiding opening port 22 to the whole internet is a very big step for keeping things safe, that is for sure.
Watching What Happens
It is a good practice to keep an eye on who is connecting to your EC2 instance and your IoT devices. AWS has tools like CloudTrail that can record who does what in your account. On your IoT device, you can check SSH logs to see login attempts. This helps you spot anything unusual, which is very helpful for security.
Sorting Out Connection Problems
Sometimes, things do not work perfectly the first time, and that is okay. You might run into issues when trying to connect via SSH. A bit of troubleshooting can often help you figure out what is going wrong, you know.
If your terminal freezes when trying to connect, especially when using a specific keypair, it might be a network issue or something on the remote side. Checking your local network connection and making sure the remote server is not overloaded can help. Sometimes, simply trying again or restarting the SSH client can clear things up, too.
If you are trying to use graphical applications and X11 forwarding is not working, remember to check the SSH output for "requesting X11 forwarding." If that line is missing, your SSH client might not be set up to ask for X11, or the server might not allow it. You can often add a `-X` or `-Y` flag to your SSH command to explicitly ask for it, which is often the fix.
When a remote script returns an error like 255, as I experienced with Git, it means the command you ran on the other side did not finish successfully. SSH just passes that error code back to you. In these cases, you really need to look at the script itself on the remote device. Running it directly on the device can show you what specific error it is giving, which is very useful for figuring things out.
If you are having trouble with key authentication, perhaps when using a tool like FileZilla to access a server, make sure you have the correct private key file. I once created keys using the terminal but then could not find them where I expected. Double-check the default location where your SSH client stores keys, usually in a `.ssh` folder in your home directory, you know. Make sure the permissions on your private key file are set correctly, too; it should only be readable by you.
To confirm that SSH is forwarding X11, check for a line containing "requesting X11 forwarding" in the output of your SSH command, which is a very simple way to see if it is even trying. If it is not, then the problem is likely on your client setup or the server's SSH settings, you see.
If your connection keeps dropping or feels unstable, especially with long-running tunnels, consider using a tool like `autossh`. This can automatically restart your SSH connection if it breaks, which helps keep your remote access reliable. It is a simple program that can make a big difference for keeping things going, that is for sure.
Frequently Asked Questions (FAQs)
People often have questions about getting their IoT devices connected securely. Here are some common ones that come up, you know.
Is using SSH for IoT devices safe enough?
Yes, SSH is considered very secure when you use it properly. This means using strong key pairs instead of passwords, keeping your private keys safe, and making sure your EC2 instance's security groups only allow connections from trusted sources. If you follow these good practices, it provides a very strong layer of security, you see.
Can I use this method with any IoT device?
This method works best with IoT devices that run a Linux-based operating system, like a Raspberry Pi or similar single-board computers. These devices typically have an SSH client built in or can easily have one installed. For very small, resource-limited devices that do not run a full operating system, this might not be the right approach, you know.
What are the costs involved with using AWS for this?
For a basic setup using a small EC2 instance, the costs can be very low, especially if you are eligible for the AWS Free Tier. The Free Tier often includes a certain amount of EC2 usage each month without charge. Data transfer costs are usually minimal for just SSH connections, but it is always good to check the current AWS pricing details on their website for the most accurate information. You can learn more about AWS Free Tier on their site, which is very helpful.
Setting up remote access for your IoT devices using SSH and AWS gives you a lot of control and peace of mind. It lets you manage your gadgets from anywhere, which is incredibly useful for all sorts of projects. Keeping an eye on your network security is always a good idea, and this setup helps a lot with that. You can also learn more about secure remote access methods for your devices, which is quite important.
Securing IoT Devices - AWS IoT Device Defender - AWS

Monitoring IoT Devices - AWS IoT Device Management - AWS

Manage IoT device state anywhere using AWS IoT Device Shadow service
